Palo Alto Networks Integration Guide
Overview
This guide explains how to configure your Palo Alto Networks firewall to forward threat logs to NxtFireGuard using the HTTP Server Profile feature.
Prerequisites
- Administrative access to your Palo Alto Networks firewall
- NxtFireGuard API credentials (
X-AUTH_KEYandX-SENSOR_NAME) - Network connectivity from your firewall to
threat.collector.nxtfireguard.deon port 443
Endpoint Details
- URL:
https://threat.collector.nxtfireguard.de/paloalto - Method:
POST - Content-Type:
application/json
Authentication
Authentication requires two HTTP headers, both obtainable from your NxtFireGuard dashboard:
| Header | Description |
|---|---|
X-AUTH_KEY | Your unique API authentication key |
X-SENSOR_NAME | Identifier for your Palo Alto firewall |
Request Format
Required Fields
All fields in the request body are required:
{
  "threat_name": "WordPress Login Brute Force Attack",
  "threatid": "18",
  "src": "185.156.73.167",
  "dst": "159.69.13.62",
  "proto": "TCP",
  "subcategory_of_app": "web-applications",
  "thr_category": "brute-force",
  "app": "web-browsing",
  "time_received": "2024/01/15 14:30:45",
  "sport": 50123,
  "dport": 443
}
Field Specifications
| Field | Type | Description |
|---|---|---|
threat_name | string | Name of the detected threat |
threatid | string | Palo Alto threat ID |
src | string | Source IP address (IPv4 or IPv6) |
dst | string | Destination IP address (IPv4 or IPv6) |
proto | string | Network protocol (TCP, UDP, ICMP, etc.) |
subcategory_of_app | string | Application subcategory from Palo Alto |
thr_category | string | Threat category from Palo Alto |
app | string | Application name from Palo Alto |
time_received | string | Timestamp when the threat was detected |
sport | integer | Source port number (0-65535) |
dport | integer | Destination port number (0-65535) |
Criticality Mapping
NxtFireGuard automatically maps Palo Alto threat severities to our internal criticality scale (0-4). No additional configuration is required on your end.
Palo Alto Configuration
Step 1: Create HTTP Server Profile
-
Log in to your Palo Alto Networks firewall web interface
-
Navigate to Device → Server Profiles → HTTP
-
Click Add to create a new HTTP Server Profile
-
Configure the following settings:
General Settings:
- Name:
NxtFireGuard(or any descriptive name) - Location: Select your device group or leave as default
Tag Registration: (Optional)
- Leave unchecked unless you have User-ID agent requirements
- Name:
-
Click on the Servers tab
Step 2: Add Server Configuration
-
In the Servers tab, click Add
-
Configure the server with the following details:
Field Value Name NFG-APIAddress threat.collector.nxtfireguard.deProtocol HTTPSPort 443TLS Version 1.2Certificate Profile NoneHTTP Method POSTUsername admin(required by the server profile but not used by us, so you may put a dummy value)Password you may put a dummy value or leave empty
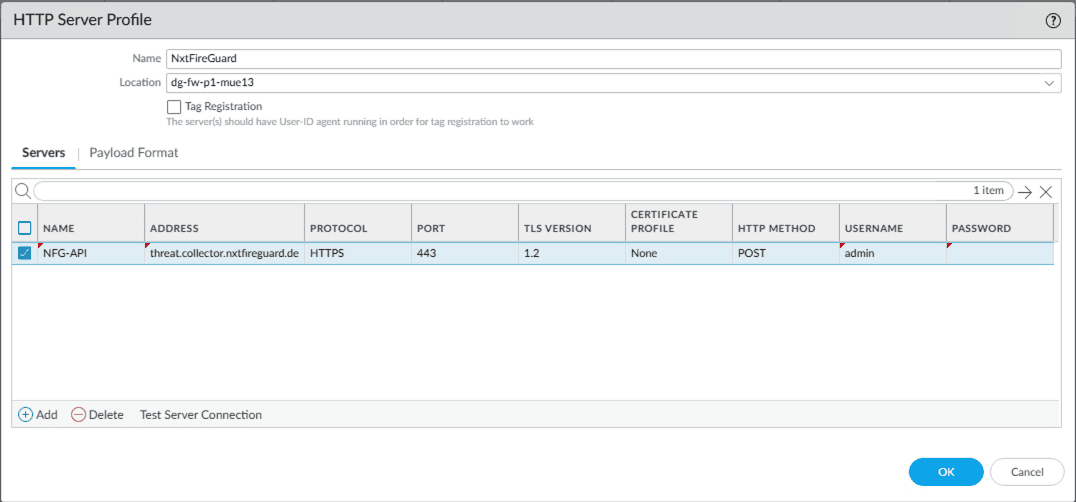 Figure 1: HTTP Server Profile configuration showing the NFG-API server entry with authentication details
- Click on the Payload Format tab
Step 3: Configure Payload Format
-
Select Payload Format tab
-
Configure the following:
Pre-defined Formats:
- Select
Defaultfrom the dropdown
URI Format:
- Enter:
/paloalto
Payload:
- Use the JSON structure shown in the right panel. The default Palo Alto variables will automatically populate the required fields:
{
  "threat_name": "$threat_name",
  "threatid": "$threatid",
  "src": "$src",
  "dst": "$dst",
  "proto": "$proto",
  "subcategory_of_app": "$subcategory_of_app",
  "thr_category": "$thr_category",
  "app": "$app",
  "time_received": "$time_received",
  "sport": "$sport",
  "dport": "$dport"
}
HTTP Headers: Add the following headers:
Header Value content-typeapplication/jsonX-AUTH_KEY<your-auth-key>X-SENSOR_NAME<your-sensor-name>To add headers:
- Click Add in the HTTP Headers section
- Enter the header name in the HEADERS column
- Enter the value in the VALUE column
- Repeat for all three headers
- Select
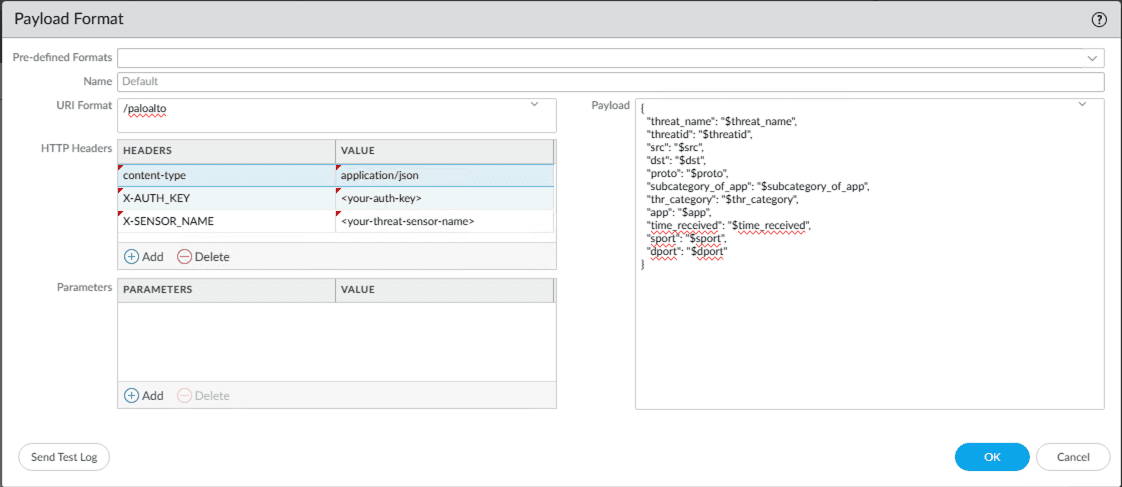 Figure 2: Payload Format configuration showing URI format, JSON payload structure, and HTTP headers
- Click OK to save the payload format
- Click OK to save the HTTP Server Profile
Step 4: Test Server Connection
- In the HTTP Server Profile configuration, click Test Server Connection
- Verify that the connection is successful
- If the test fails, check:
- Network connectivity to
threat.collector.nxtfireguard.de - Firewall rules allowing outbound HTTPS traffic
- Correct authentication credentials
- Network connectivity to
Step 5: Create Log Forwarding Profile
-
Navigate to Objects → Log Forwarding
-
Click Add to create a new profile
-
Configure the following:
General Settings:
- Name:
NFG-API(or any descriptive name) - Description: (Optional) "Forward threat logs to NxtFireGuard"
- Log Type:
threat - Filter:
All Logs(or customize based on your requirements)
- Name:
-
In the Forward Method section:
- Expand the HTTP section
- Check the box next to HTTP
- Select your previously created HTTP Server Profile:
NxtFireGuard
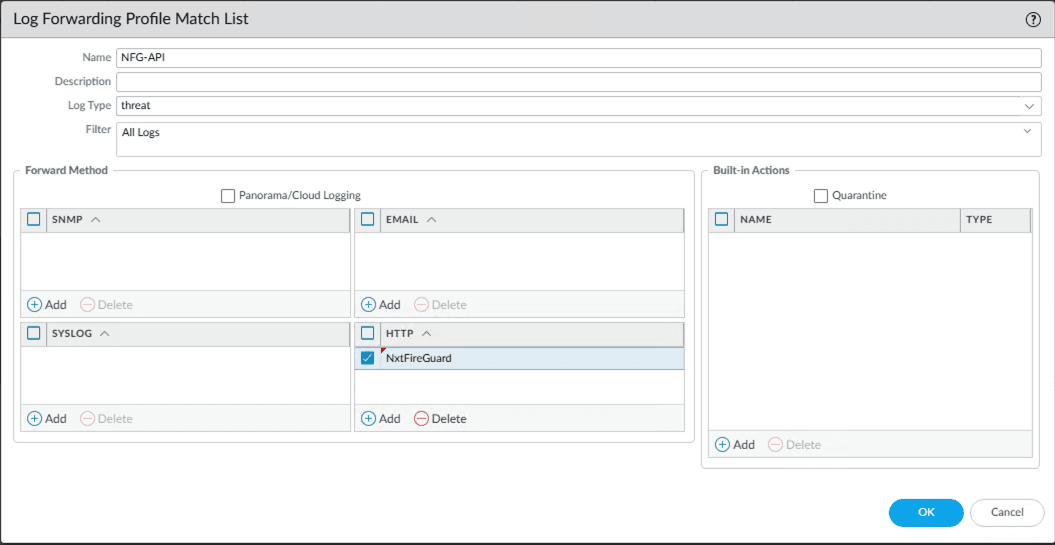 Figure 3: Log Forwarding Profile Match List showing HTTP forward method with NxtFireGuard profile selected
- Click OK to save the Log Forwarding Profile
Step 6: Apply Log Forwarding to Security Policies
-
Navigate to Policies → Security
-
Edit the security policies where you want to forward threat logs
-
In the Actions tab of each policy:
- Under Log Settings, select your Log Forwarding Profile:
NFG-API - Ensure Log at Session End is enabled
- Under Log Settings, select your Log Forwarding Profile:
-
Click OK to save the policy changes
Step 7: Commit Changes
- Click Commit in the top right corner
- Review the changes
- Click Commit to apply the configuration
- Wait for the commit to complete successfully
Verification
Test Log Forwarding
To verify that logs are being forwarded correctly:
- Generate a test threat event (e.g., trigger a security rule)
- Navigate to Monitor → Threat logs in your Palo Alto interface
- Verify that the threat was logged
- Check your NxtFireGuard dashboard to confirm the threat was received
Troubleshooting
If threats are not appearing in NxtFireGuard:
-
Check HTTP Server Profile status:
- Navigate to Device → Server Profiles → HTTP
- Select your profile and click Test Server Connection
-
Verify authentication headers:
- Ensure
X-AUTH_KEYandX-SENSOR_NAMEare correct - Check for typos or extra spaces in header values
- Ensure
-
Check system logs:
- Navigate to Monitor → System logs
- Filter for HTTP server profile errors
-
Verify Log Forwarding Profile:
- Ensure the profile is attached to active security policies
- Check that the log type is set to
threat
-
Network connectivity:
- Verify outbound HTTPS (443) connectivity to
threat.collector.nxtfireguard.de - Check for any firewall rules blocking the connection
- Verify outbound HTTPS (443) connectivity to
Code Examples
While Palo Alto handles the integration automatically, here is an example for testing the endpoint manually:
cURL
curl -X POST https://threat.collector.nxtfireguard.de/paloalto \
  -H "Content-Type: application/json" \
  -H "X-AUTH_KEY: your_auth_key_here" \
  -H "X-SENSOR_NAME: your_sensor_hostname" \
  -d '{
    "threat_name": "SQL Injection Attempt",
    "threatid": "30001",
    "src": "192.168.1.100",
    "dst": "10.0.0.50",
    "proto": "TCP",
    "subcategory_of_app": "database",
    "thr_category": "code-execution",
    "app": "mysql",
    "time_received": "2024/01/15 14:30:45",
    "sport": 54321,
    "dport": 3306
  }'
Support
For additional assistance or questions about integration:
- Documentation: https://docs.nxtfireguard.de
- Obtain credentials: NxtFireGuard Dashboard